|

|
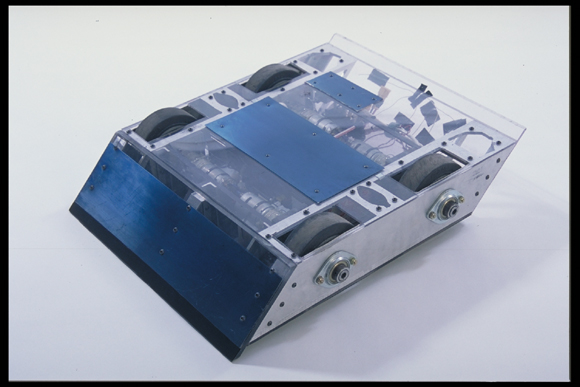
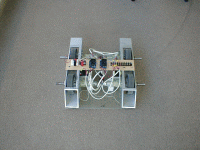
Bad
Habit Mark I at Las Vegas
|
Starting
September 1st, 2000 I had posted a series of updates on building
Bad Habit on the Bot
Builders Discussion Forum. This is a copy of those updates,
along with the pictures I attached to them. There are also some
pictures/comments that I never posted to the forum.
I
had been acquiring a POP (builder jargon for Pile Of Parts) for
months before hand but this is when I really started building.
The competition was starting in mid November so I had 10 weeks
to put it all together.
Click
on any picture to see the larger version of it.
|
 |
|
9/1/2000:
Coming
up with a name for my lightweight bot has not been easy. For now,
"Bad Habit" is as good as any and an apt description
in many ways. And I hope my bot is a hard one to stop.
This week -
*
Finally received my cordless drill motor/gearboxes after being
backordered for a month. I will spare you the saga of the wrong
shipping address and overcharging. They are very nice, 400RPM
(at 18V) , 320in-lb torque. Gearbox output is a 1/2" threaded
rod about a 1" long. I plan on running them at 24V. Hopefully
we will get a speed of around 11ft/sec at that voltage.
*
Went by Reel-Rite in Hayward, CA today to pickup some Colson Performa
wheels (6" x 2"). The guy there knew exactly what I
was talking about when I said there where for robot combat.
*
Picked up some structural aluminum and steel rod for the drive
shafts. The word is getting out - the guys at the metal supply
place knew about robot combat as well.
*
Ordered the speed controllers. I'm going with the Innovation First
24V version. Add a mixer and away we go.
*
Finally, I went to the tool store and picked up a 4" bench
vise and 55lb spring scale. I hope to use the scale to measure
what the torque actually is, not just what the specs say it should
be.
Weekend
plans -
*
It's time to get serious about the design. I've been using scrap
wood and cardboard so far to get general layout concepts, but
now that buying metal is on the horizon, I need to know what I
need exactly and where it goes. I'm going to try my hand at 3D
modeling software, never having done it before. Should be interesting.
I have either in my hands or the published dimensions for every
major part that needs to be inside the bot, so now it's a matter
of figuring out where all the structural supports go and how the
chassis will be done. Hopefully in the end I will have a detailed
blueprint to go forward.
*
When MEGO from the 3D modeling, I'll work out my plan for the
drive shafts. I have the motors, the drive shafts, and the wheels
now, but connecting the shafts to the motors and the wheels to
the shafts is still to be done. I do have a plan.... It will be
interesting to see how it comes out for a guy who can't mill or
lathe or weld. It's all gonna be drill, cut and tap for this.
Heh. If I have the time, I'll go out and do more tool shopping.
Nothing like buying tools to lift a man's sprits.
|
|
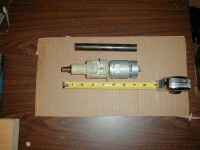 |
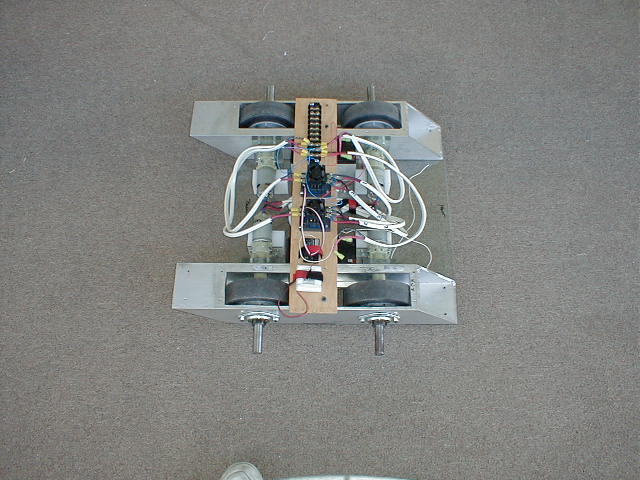
9/2/2000:
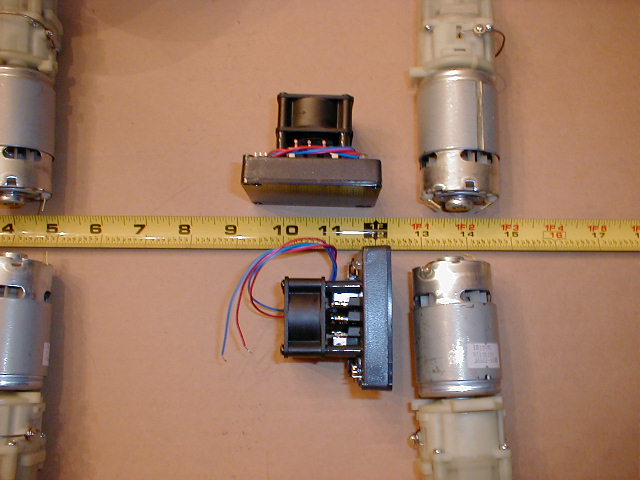
To
give all the newbies a visual aid, here is a picture of one of
my cordless drill motors. 320in-lb of torque at 400RPM at 18V.
Will be running at 24V. Above the motor/gearbox is the drive shaft
that needs to be drilled out and tapped for the threaded end of
the gearbox.
This
is the same style motor/gearbox you will find in most of the inexpensive
18V 1/2" 2-speed cordless drills. Not the single speed 3/8"
drills, those have a little less umph.
|
|
|

|
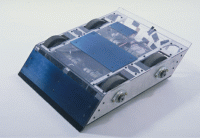
9/7/2000:
After
spending most of last weekend trying to figure out various 3D
modeling software programs, I'm going to punt and go with EAD
- Eyeball Aided Design. Here's the layout of some of the major
parts. I've since done some rough weight calculations and decided
to go with a 4-wheel version, not the 6 wheel version. Much cutting
and drilling and tapping of aluminum is in my near future, along
with finishing up the drive shafts.
Newbies
- While having a fancy dealer of death would be great, I'm going
for simple and robust in my first bot. This might just be a simple
wedge design, or I might put in a flipper arm. Still undecided
and I want to see how the weight comes out first.
A
hint - Tapping the inside of the steel drive shafts to an inch
depth is tough, but when all you have is a tap and no tap wrench,
you are SOL. My makeshift tap wrench blew up just as I was finishing
the second drive shaft. New wrench is on order.
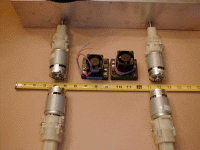
The
second and third photos are of the 24V speed controllers from
Innovation First (http://www.innovationfirst.com).
Tiny, are they not? There are 12 Misfits in each, rated to around
58A contin. Add in the mixer and I have plug-n-play speed control,
directly into the RC receiver. I'll probably go nuts and add a
microcontroller into it somewhere to do some things that a basic
speed control won't handle, but I could go the pure, no code plug-n-play
route if needed.
|
|
|
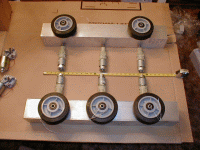
9/7/2000
to 9/29/2000:
During the next few weeks I was scrambling to work out the details
on the drivetrain and other parts of the bot. I took some pictures
but never posted them on the forum.
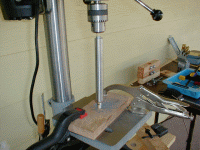
Turns
out that the steel tube I got for my driveshafts had an outside
diameter of 11mm, while my flange bearings where 3/4". That
meant they where just a hair too "fat" to fit into the
bearings and I needed to take off a wee bit. So I put together
a jig on the drill press and used up a fair amount of 100 grit
wet/dry sandpaper to bring them down to the point they fit the
bearings. Took some time but it worked in the end.
|
| |
|
|
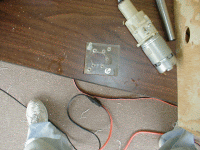
I
had decided to mount the motors directly to the side of the aluminum
square tubing. The way I did this was to hand carve out of a sheet
of 1/2" thick polycarbonate the pattern for the gearbox,
and use 1/4"-20 socket screws in the drill gearbox clutch
holes to keep the whole thing together. It actually worked out
quite well - even after the beating the bot took in Vegas I was
able to recycle all the motor mount plates in Bad Habit Mk. II.
|
| |
|
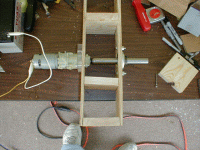 |
Since
I was clueless, I took the precaution of doing a full size mockup
with plywood standing in for aluminum as a testbed and to see
what needed to be done to make it all work. This is one motor
mounted in the plywood box I made to the same dimensions of the
aluminum sq. tubing I was going to use. Note that the motor/gearbox
is directly bolted to the side of the square tubing via the socket
screws in the clutch holes and the 1/2" polycarb motor mount.
|
|
 |
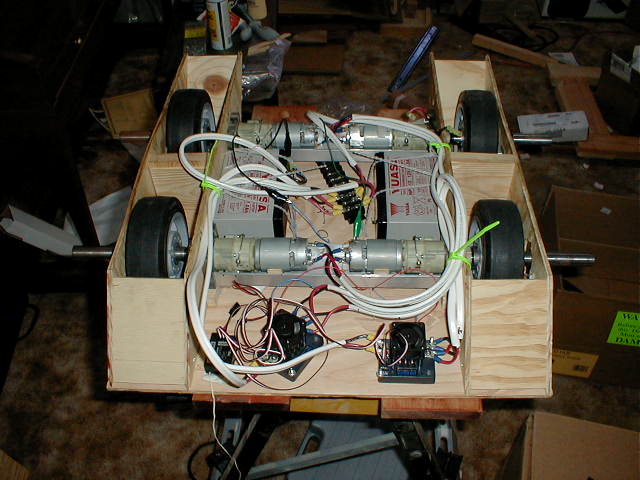
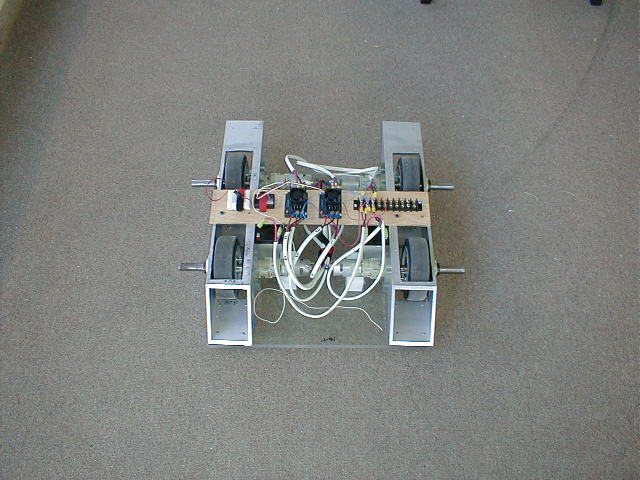
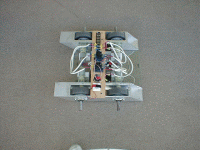
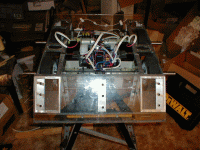
9/29/2000:
Progress
has been made in the last month, but I do feel like the clock
is ticking. I decided a couple of weeks ago to go with PAD - Plywood
Aided Design. I would build a rough draft of the bot out of thin
plywood then start doing it all again in aluminum and polycarb.
I've
learned a lot working on it the last two weeks. I'm on about the
4th different drive shaft concept, but this one actually does
work. I still have to make some changes, but thanks to PAD, all
the problems have been in cheap lumber, so it wasn't a huge issue.
Today
I actually started putting stuff together. It's amazing what happens
when it starts to look like something. I'm missing some servo
wire connections, so I have to go out and get those tomorrow.
But this weekend I should have the PAD version up and running.
It will be great to get mobile.
Picture
- starting to look like something. Note the fine adjustment tool
in the back, a 24oz rubber mallet. No newbie should be without.
Yes the drive shafts are a bit long, they will be cut down to
a better size as one of the last things done on the "real"
model. Same with the drive motor wires, too long right now but
I want to see how it lays out before going in with the cutters.
|
|
|
|
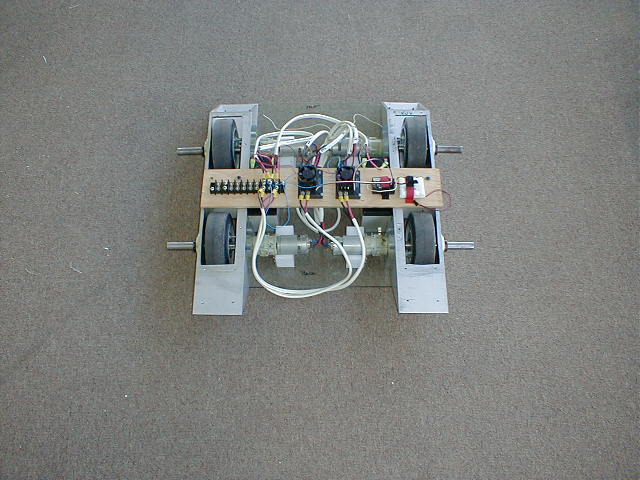
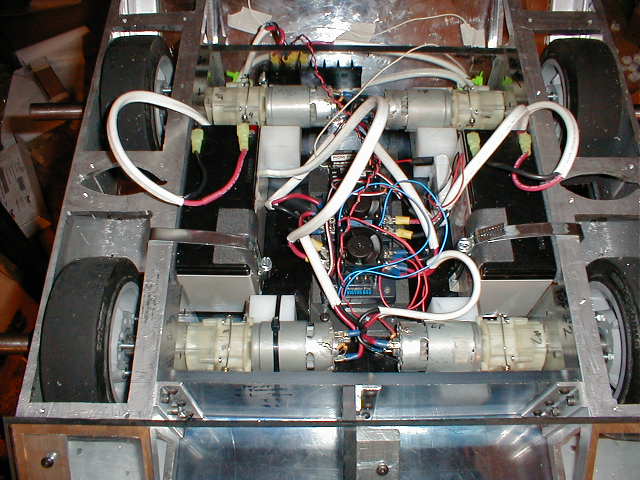
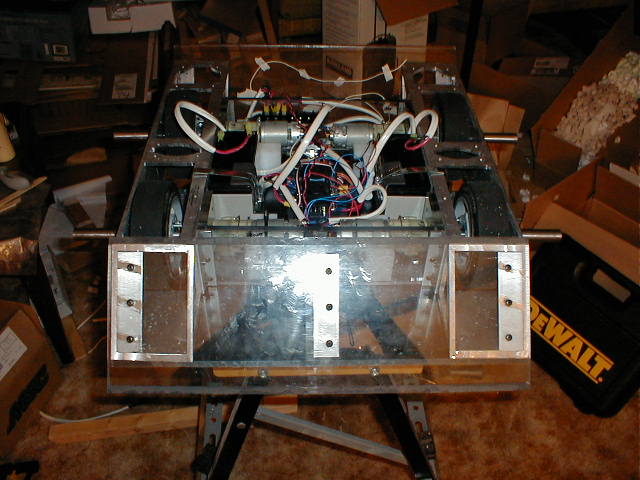
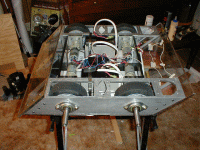
10/10/2000:
I'm
done with the PAD stage of things, time to move over to real materials
like polycarb and aluminum and delrin. Here's what the final PAD
setup looks like. Wires and stuff everywhere, all will be trimmed
down in the final version. Still working on exactly where the
speed controllers go, but it works with them in the front like
that. The nice thing about the innovation first controllers is
that they are small and can fit almost anywhere.
I'll
be going with nicad batteries in the final version, the gellcells
are for testing. Fired up the transmitter and hooked up the receiver
into the speed controllers - worked like a charm.
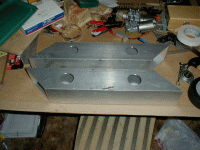
Put
an aluminum cutting blade on my 10" table saw over the weekend
and started cutting up the 4" sq. alum tubing. Came out nicely,
cuts easily with that blade. Here's what those aluminum sides
look like before I put in the holes for the wheels and to lighten
them. Need to cut their weight in half, but that should not be
a problem.
Got
a call from BBHQ - my application was in and I'm all setup for
Vegas. Guess I better get this thing done soon as to get some
driving practice in.
|
|
|

|
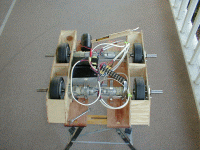
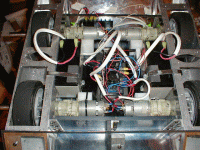
10/23/2000:
It
Moves! Yep, the basic frame and motor and gears and wheels and
the rest are in place. Here's the test setup I'm currently using
- speed controllers and the receiver are on that piece of plywood
for easy access. In the end I'll be trimming down all the wires
so it fits inside. I will also be replacing the gellcells with
NiCads.
Need
to work out the mixing. Driving it two stick right now, seems
very sensitive to the controls. Just a hair movement on the stick
and the speed controllers go full blast. Need to calibrate them
and add in the mixer thingie I got from the link off the teamdelta
site.
Of
course, once I started driving it around, one of the retaining
pins that holds the driveshaft to the drill motor came loose and
the driveshaft and wheel are now very stuck against the side of
the wheel housing. Looks like I'm going to have to tear it down
fairly deep to fix that. Ah well. Just disconnect that wheel for
now and work on the mixing. Get that fixed, tear it down and get
the wheel back inline, GET A BIGGER RETAINING PIN. then it's back
to driving practice.
|
|
|
10/24/2000:
Ah,
the wonders of actually having a bot that moves. Learn all kinds
of things. I'm using the aftermarket mixer thingie from New Zealand,
got it to sortof work. Still need to play with it lots.
First, you drive it around for a bit, and have a retaining pin
fall
out and screw up a wheel. Go to hardware store, get bigger, badder
retaining pin. Tear down robot, fix screwed up wheel, install
with better pin.
Take
out again for a test drive. Design flaw shows itself quickly.
Cheap piece of softer steel is all bent. Was going to replace
that with tool steel anyway, cheap piece just for testing. Replace
with another cheap piece of steel, try again. Will be getting
tool steel this week. Stop, tear down bot, fix design flaw, try
again.
Once
more into the breech, my friends. This time while trying to make
it move, a New, Improved, and different Design issue shows up.
Stop, put the bot up on blocks, fix new and improved design issue.
See where the initial design lends itself to problems. Think hard,
don't have great solution for issue. Put it all back together
again and hope it doesn't really screw it up. Take many mental
notes for when building next bot on what works and what doesn't.
My "what doesn't" list is much longer at this point
in the learning curve.
Take
for another test drive. Actually will run for 3 minutes without
falling apart.
Decide
to go all out, charge up the batteries, put it on the street,
and walk it up and down the block. Get many looks for the neighbors.
Chase squirrel up tree.
Now
that she has some road time, I'm starting to see where stuff is
going to fail most often. One of the motors is acting funky and
I can't see an obvious reason why. Need to play with it. A benefit
of that motor acting up is that I found that yes, it will move
and is somewhat controllable with only 3 powered wheels. Wouldn't
want to run an entire match that way, but it's good to know it
will still operate like that.
Time
to work on more of the internal supports and external plating.
Work on that motor as well, figure out what's going on. In a few
days should have it ready to do some damage testing - see what
it can take and dish out.
|
|
|
|
11/1/2000:
This
is probably the last update before Vegas.
Spent the last few days getting into the nitty gritty details.
Replaced some very soft steel parts with tool steel - much better.
Took her to the post office today to be weighed. On a scale accurate
to a tenth of an ounce, the current bot without the final top
plate is 54.24lb.
I still have a pound or two of stuff to cut out and the top plate
will be anything from 2lb to 4lb depending on what thickness of
polycarb I use. So it looks like the final weight will be 56.5
to 57lb. That's the target.
Still having trouble with the mixing - right now everything is
shifted 90 degrees on the transmitter - right and left are forward
and back, forward is left, back is right. Trying different settings
to fix that. Ah well.
Getting a good feel for driving, even with the TX turned sideways.
And
now for those pictures you all love....
|
|
|
11/13/2000:
One
final note:
Finished up the last little piece yesterday. Put a small strip
of armor on the top plate and drilled the access holes for the
main power switch. Took her out for a spin. For the first time
ever, it was all there in one piece and ready to fight.
I
did the 5 minutes into a wall test - no problem. Wheels spun quite
well and the 60A fuses I had installed for testing didn't blow.
The fuses will be removed before real combat. The new battery
chargers I got put them back up to full charge in 90 minutes after
this test. Plenty of time.
I
did the drive upside down test - no problem. I had thought I might
have to reverse a servo, but it turns out that forward/reverse
on the TX is the same on both sides. Sweet. Guess this is what
you get for not really thinking about it hard.
With
the amount of torque I have in the drivetrain, it seems to go
from stop to full speed in about 5 feet.
Finally,
I did the stand-on-top and move test. Worked great, carried the
additional 215+ lb of me and the TX with no problems. Not bad
for a 57lb bot. Seemed to be going the regular "top"
speed, but that is hard to judge. Going in a straight line is
a breeze, any kind of turn and the rider is thrown. After riding
around the block on top of my bot, I pulled the top plate to see
if anything had broke. Nothing did, but boy are those Mabuchi
775VF motors hot.
The
spare batteries I ordered that where supposed to be here last
week have yet to arrive. A call to the supplier turns up that
they shipped them from the warehouse 3000 miles away, not 600
miles away as originally promised when I ordered. Makes a difference
when going UPS ground. Supposed to arrive tomorrow, the last day
before I leave. I have some backup places around here I can buy
other batteries, but I would rather not because the ones I ordered
where dirt cheap. sigh.
|
|
|
AFTER
ACTION REPORT
|
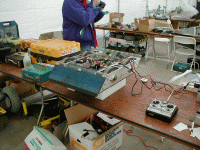 |
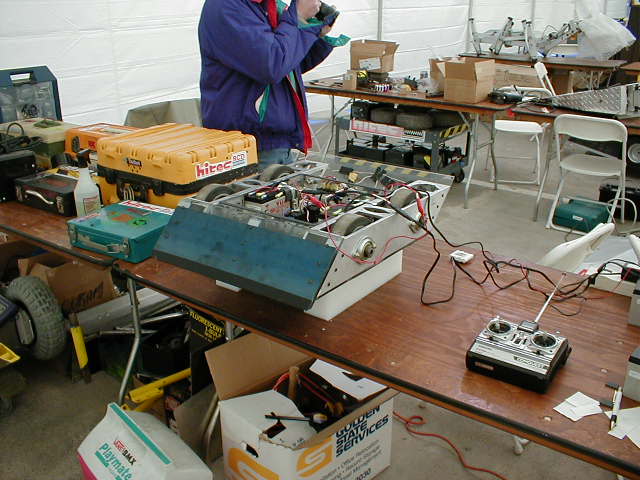
11/20/2000:
Had
a great time in Vegas, but it's good to be home after that long
drive back.
Bad
Habit showed a few design flaws in the fights, and that I really
need to work on my driving skills.
Here's
a pix of the bot in the pit with the top off and charging the
batteries.
I
had the great luck to share a table with Donald with Tazbot/Diesector
on one side, and Gage with Vlad on the other. Learned a lot from
those guys and studied their designs up close and personal.
Bad
Habit is now retired and put out to pasture. I might use it as
a R&D platform on some driving/controller/weapon ideas, but
it will never see the Box again.
New,
Improved Bots designed and built with those hard earned lessons
and ideas stolen only from the best will be showing up in the
future.
|
| |
|
|